Indulge your love for farm animals and charming chickens and goose with these delightful Farmyard Friends Collection! These knitting & crochet patterns are designed for enthusiasts who appreciate the whimsical charm of the countryside. Create adorable, handcrafted pieces that celebrate the joy of farm life.
Let’s kick off with these incredible chicken and goose hats. Aren’t they just amazing?
Explore the patterns further by clicking on the images.
Immerse yourself in the world of rural charm with knitting patterns featuring a variety of farm animals, from cuddly cows to playful rabbits, horses and more.
From sweaters to adorable wall hangings and pot holders, this collection offers a variety of projects suitable for both functional and decorative purposes.
For the ultimate delight, indulge in a few more mittens and socks patterns.
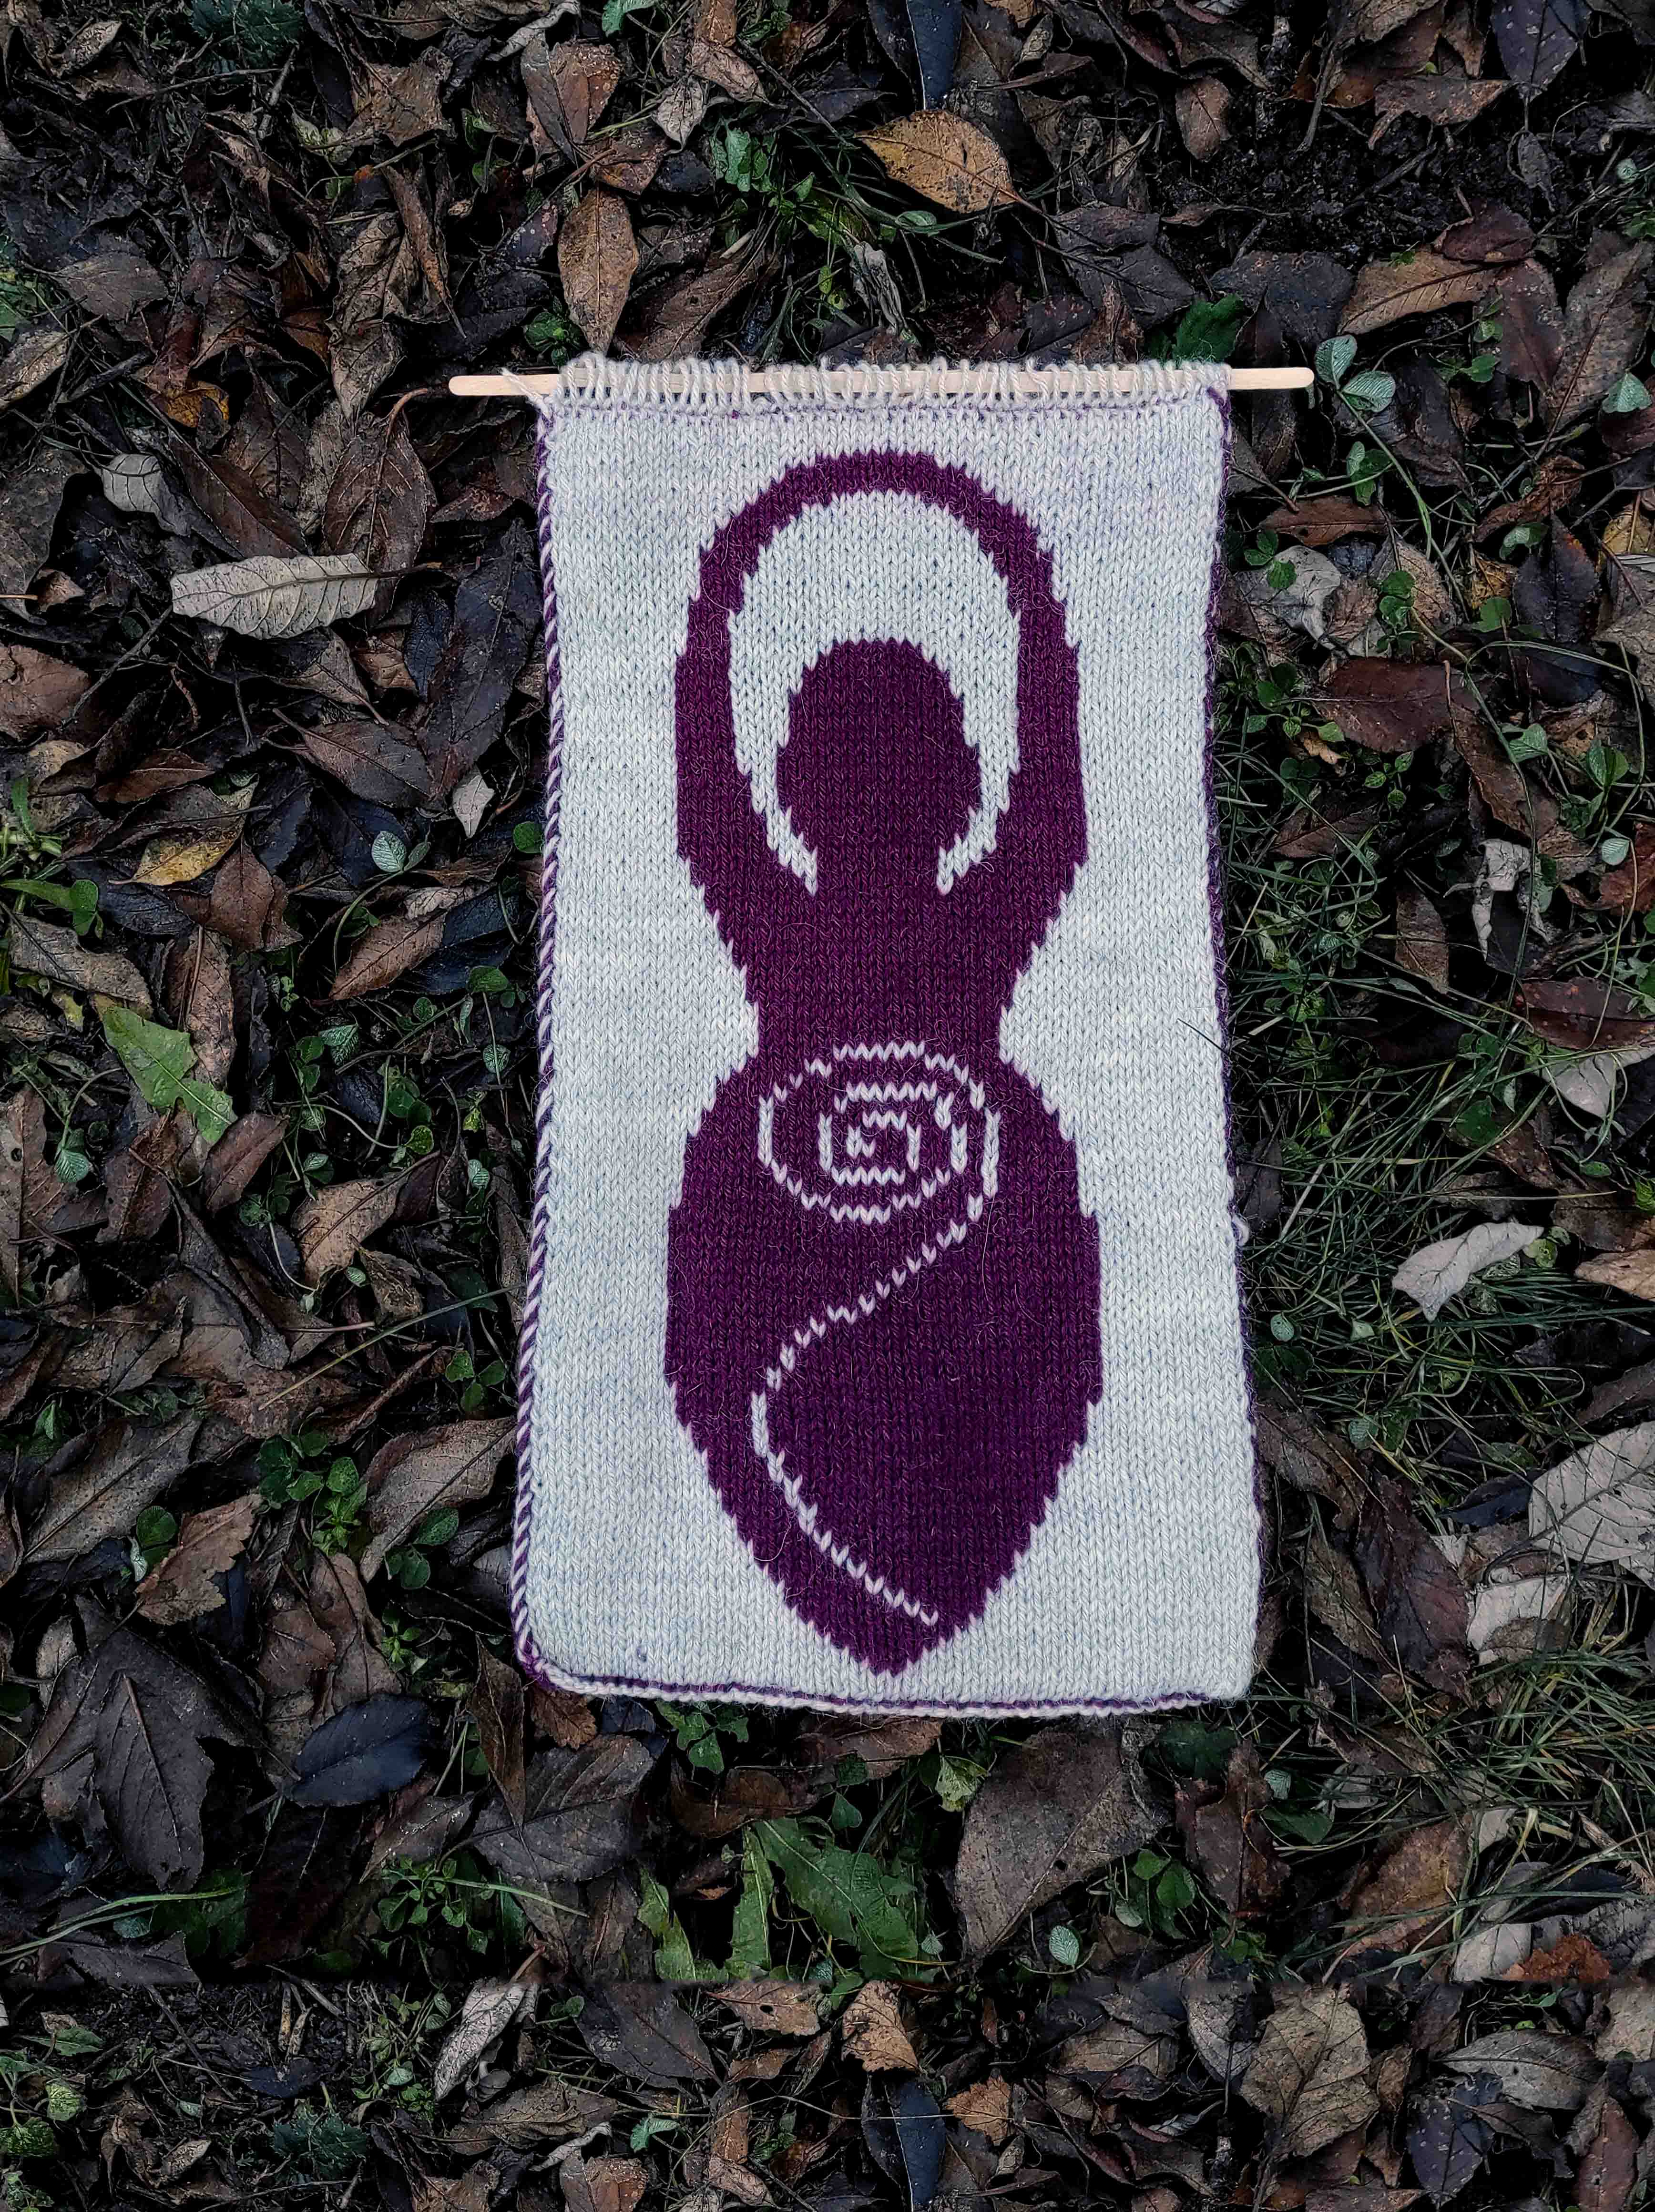
The Spiral Goddess symbolizes female strength, fertility and life cycles, reminding women worldwide of the unique power they hold within.
If you want to have such handmade tapestry let’s knit/crochet it yourself!
You need to know how to make double knit or intarsia crochet. And if you a very very beginner, you need to practice a little, but don’t be intimidated by the new stitches and tools. It really is very simple if you already know how to knit / crochet.
If you’re interested in purchasing this crochet wall hanging pattern or any of my other patterns in a downloadable, printable PDF format, they’re available for purchase on my Payment Page below.
Size of the tapestry depends entirely on your gauge and uses yarn.
I knitted on size US 4 needles and Drops Lima yarn. My gauge was 19 x 22
After wet blocking hanging vertically (so tapestry was stretched a little in tall) the size was: 23 x 45 cm / 9 x 17”
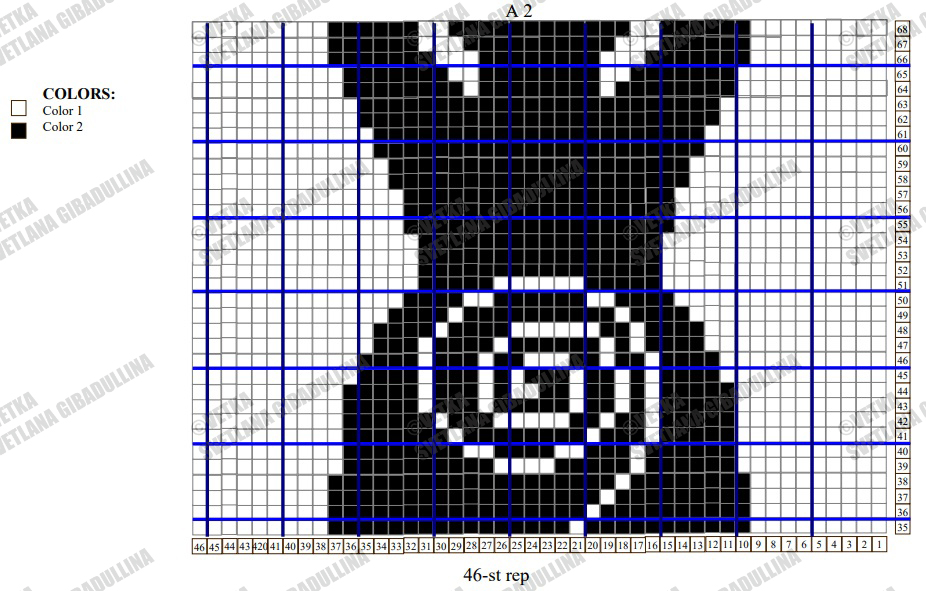
COLORS:
Color 1– 1 skein; Color 2 – 1 skein;
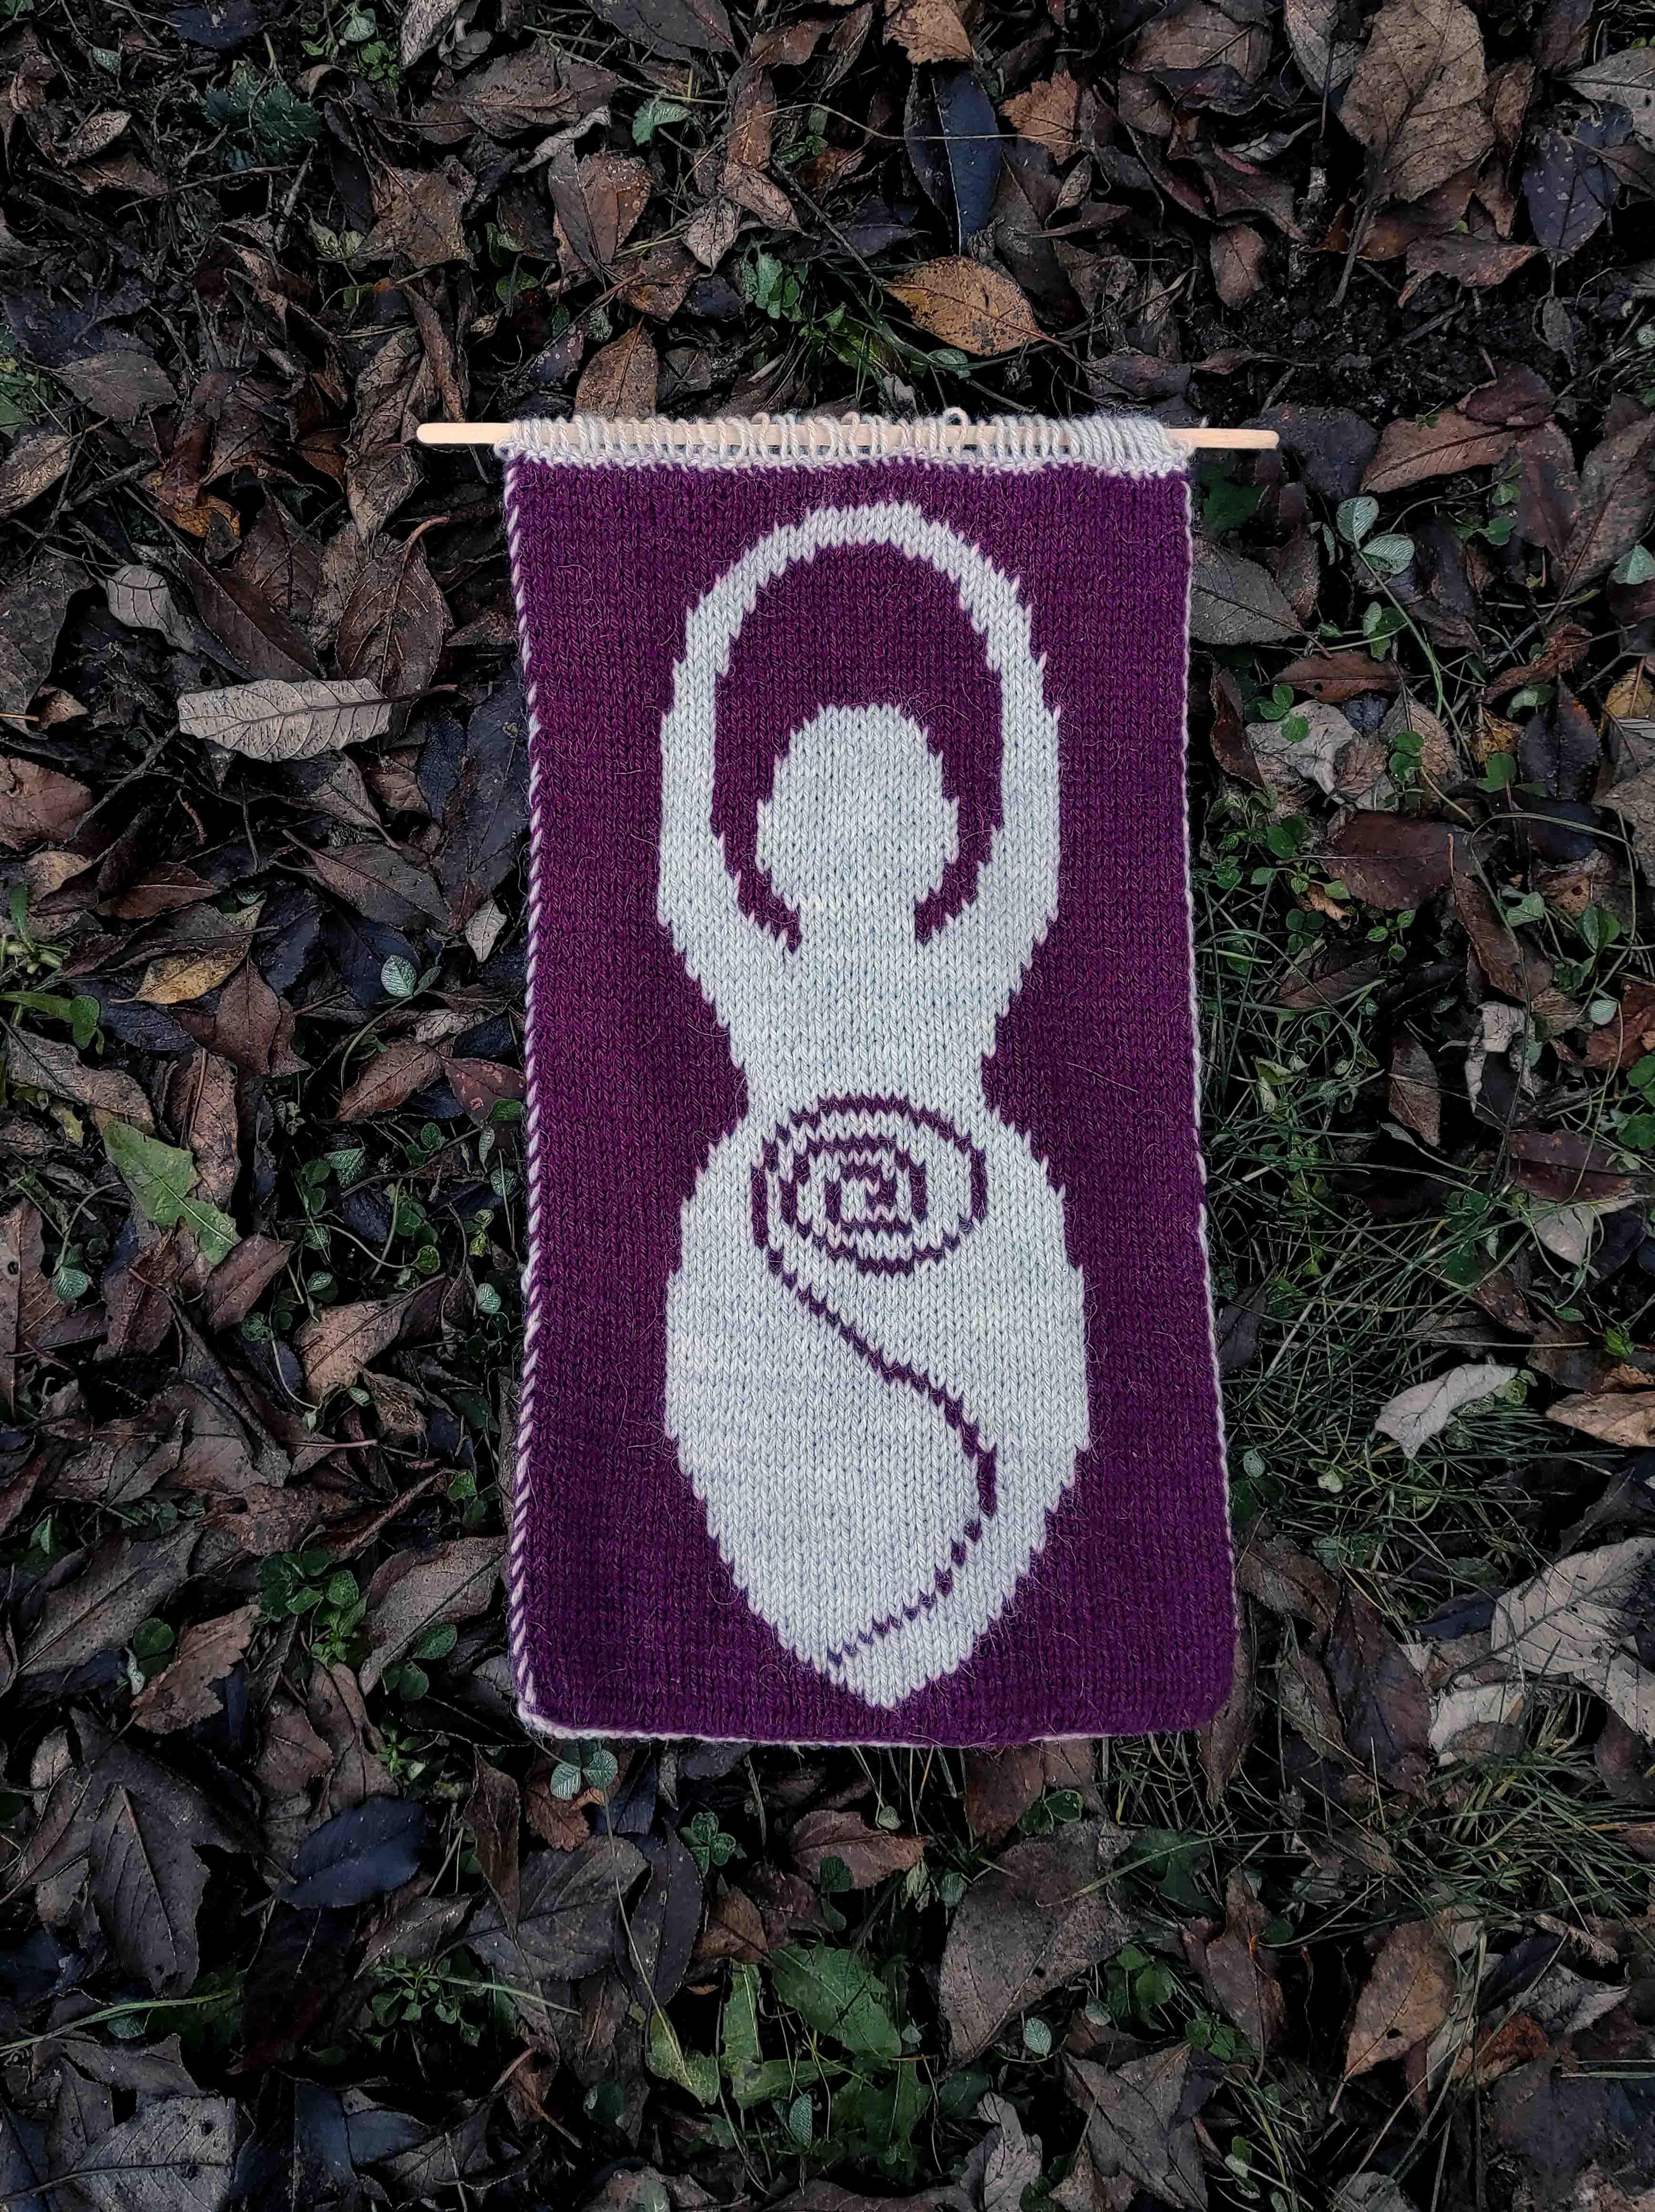
Designate your two colors as Color A and Color B. There is no RS or WS to your work, as it is reversible.
KNITTING
HOW TO DOUBLE KNIT Double knitting is knitting a fabric with two stockinette sides simultaneously. On each row you are working alternating stitches from each side, knitting one and purling the other.
STICH GLOSSARY
P = Purl K = Knit Rnd(s) = Round(s) Rem =Remain(ing) st(s) = Stitch(es) BO=Bind Off
MATERIALS: CIRCULAR NEEDLE (40 cm / 16”) SIZE 3.5 mm/US 4 Any Aran/Worsted yarn suitable for US 3.5 (4 mm)
Cast on 46 stitches with circular needle size 3.5 mm / US 4 (or any you prefer) A cast on of 46 means there will be actually 92 loops on the needle, 46 for each side.
Knit rnds 1 to 102 of A1, A2, A3 reading rows from right to left.
As this pattern requires a lot of attention to detail, I suggest you print out the PDF and use a row tracker or highlighter, or pencil to mark which rows you have worked on.
BO and leave a long tail.
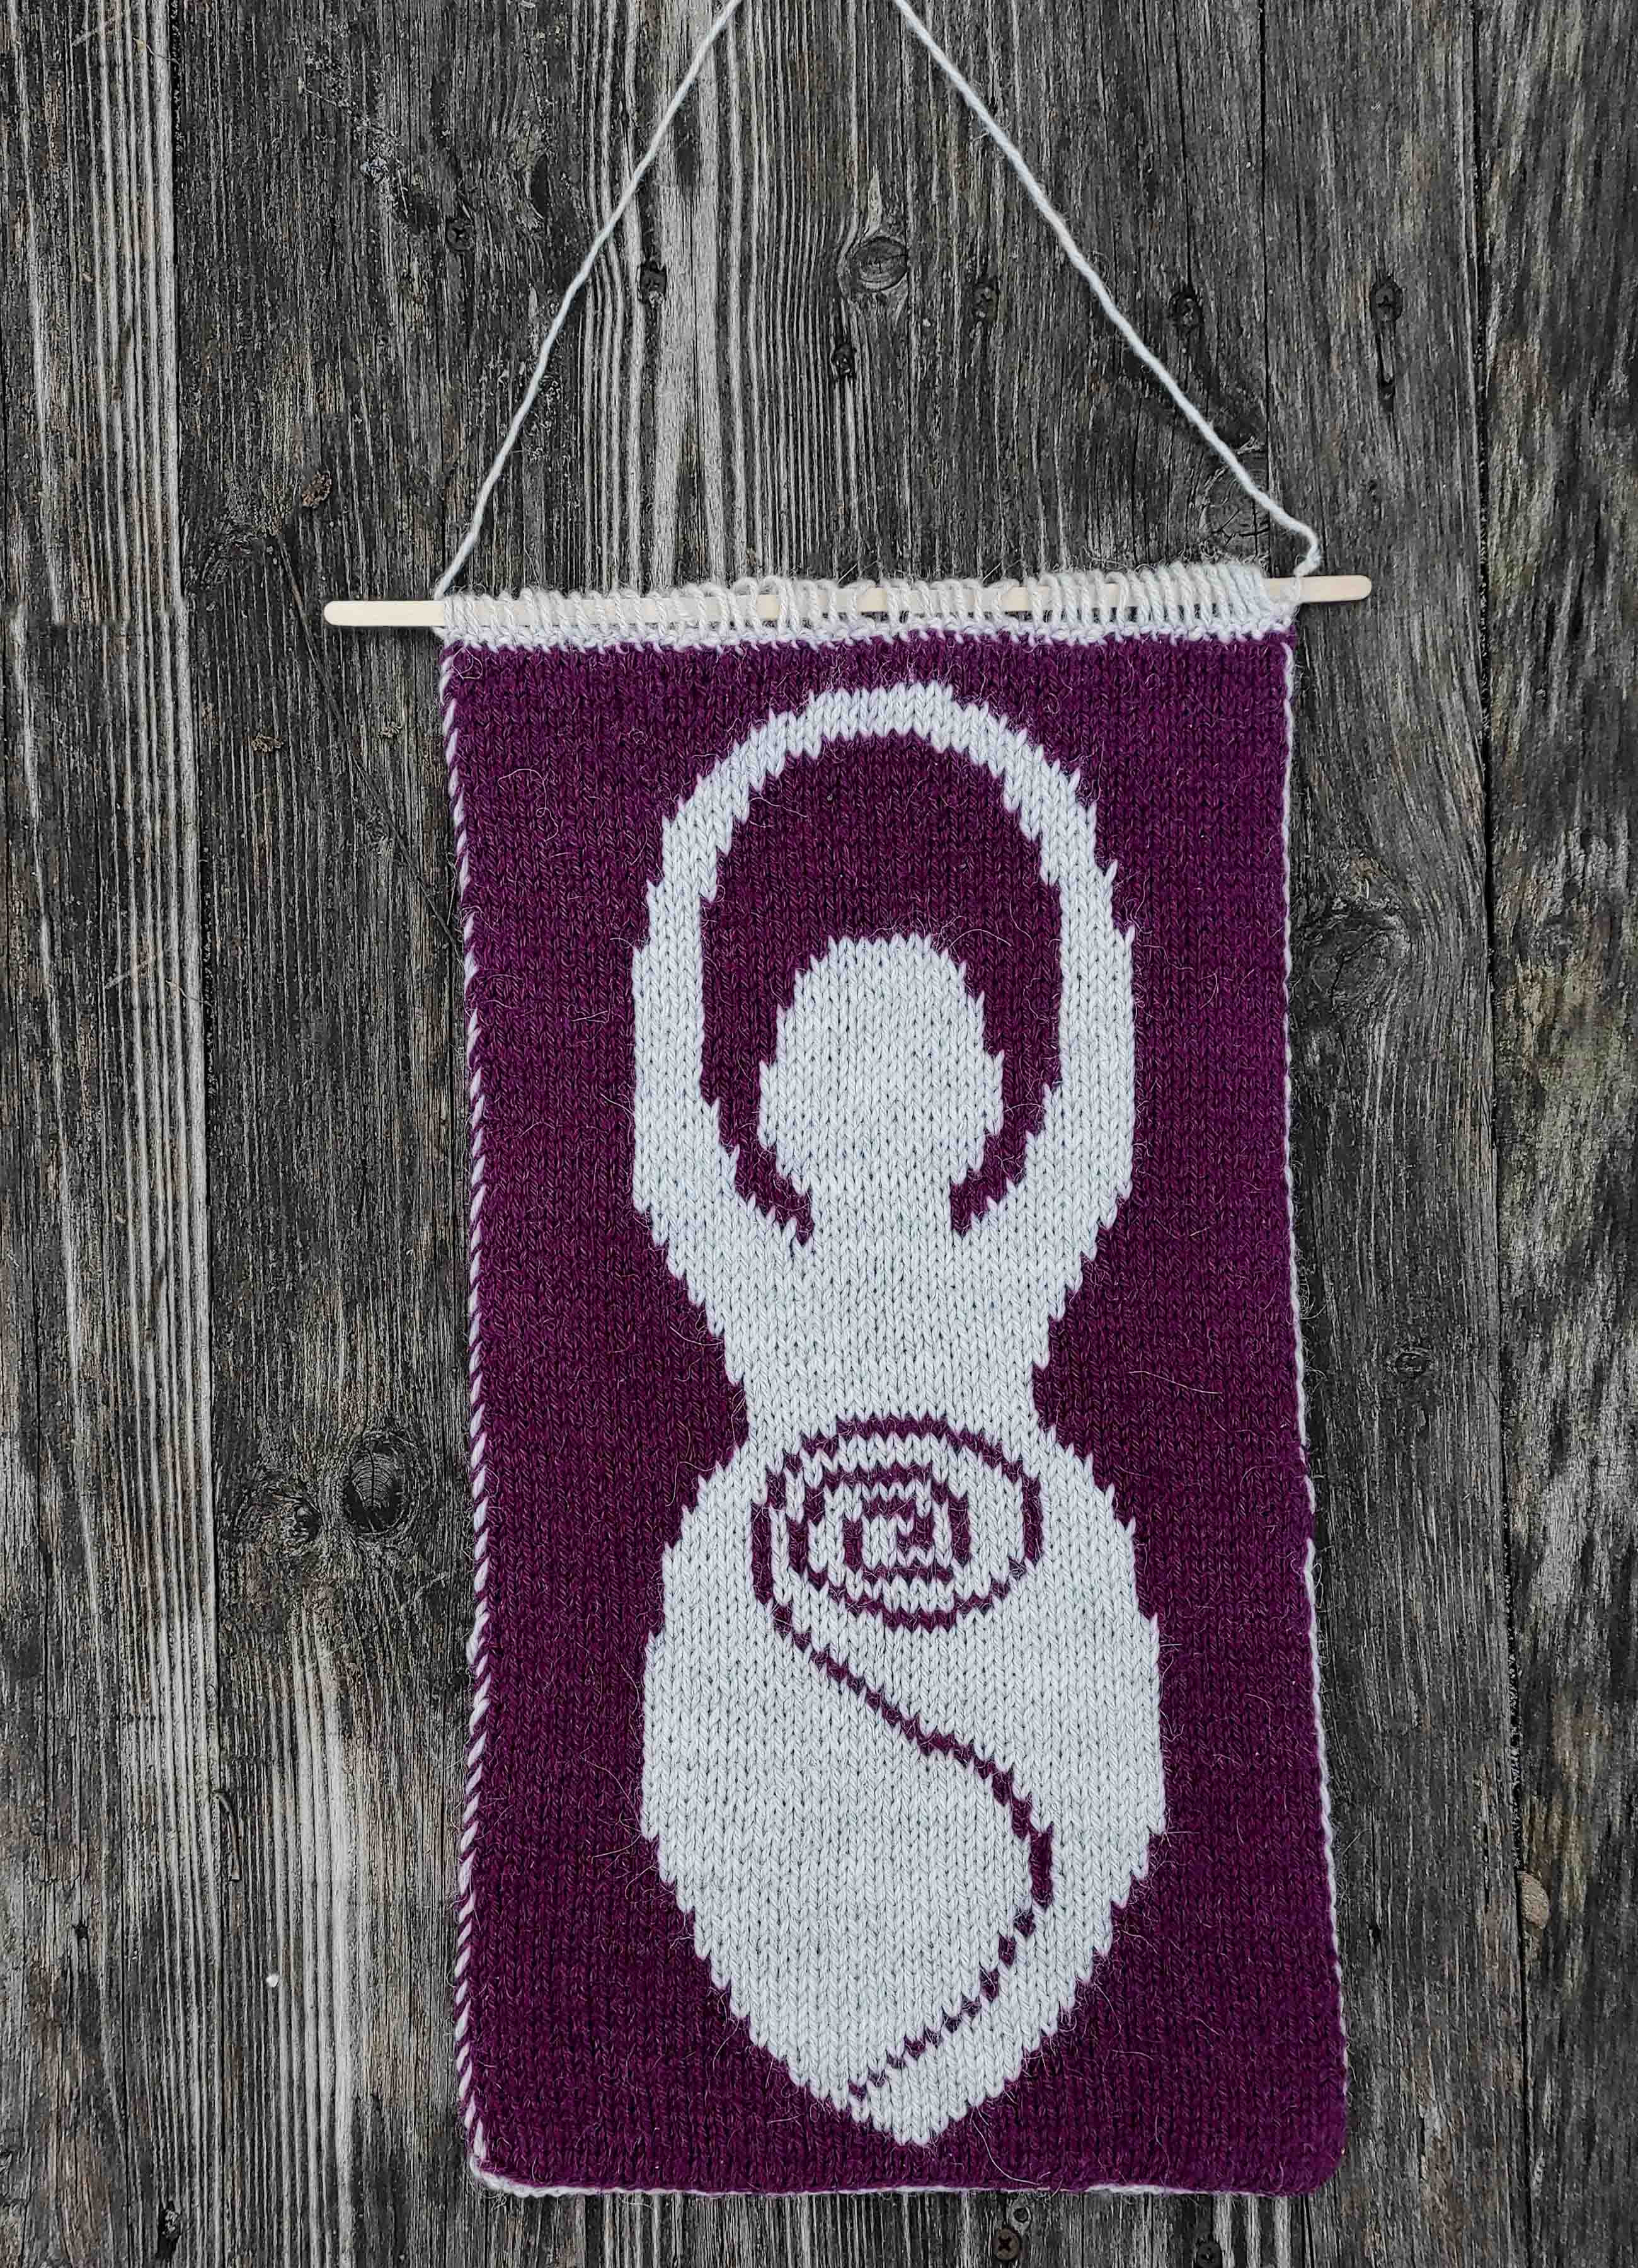
Thread the tail through a tapestry needle and thread it around what youʼre hanging it on, then through one of your BO stitches and around the piece of wood again. Keep doing this until you have completely connected it to whatever youʼre hanging it from.
CROCHET
ABBREVIATIONS
CH = chain SC = single crochet SK=skip YO=yarn over REP=repeat ST=stitch RS= rigth side WS=wrong side
Make the base chain 46+1 in Color 1. SC into the second chain from the hook and work 1 SC into each of the next 46 chains. At the end of the row, CH 1 and turn See the Charts A1, A2, A3
BORDER Crab stitch into each stitch around the entire tapestry, working 2 crab stitch into each corner.
Thread the tail through a tapestry needle and thread it around what youʼre hanging it on, the through one of your BO stitches and around the piece of wood again. Keep doing this until you have completely connected it to whatever youʼre hanging it from
Also if you want to make the version a little bigger (50 x 130), you can use the following chart
I want share the joyful news that I’ve started to make a collection of unique FREE knitting charts. These are patterns that I plan to embody into new products someday… Now I want to share them with you here
I love the theme of cats, I have a lot of them. And just look at this fat cat. Oh dear! I want a bag like this!!
And look at this mysterious magical woman. Woman is a magical creature, hovering between two worlds. One part lies in the heavens, talking to the stars and the celestial luminaries, and the other, very earthly, with strong roots clinging to the earth.
This scheme is perfect for the wall decor, or you can create a unique sweater.
Pay attention to this angry, surly cat. Oh lovely!
So visit these section. I will be adding new free charts to this collection
I’m so excited to share my FREE Colorblock Oversized Crochet Sweater. The sweater is very stylish and comfortable and has a wavy diagonal stripes.
This sweater is worked from the bottom up. The pattern is made in 4 separate pieces and then sewn together.
Copyright notice: You may not reproduce any of the photos or the text without obtaining written permission from me first. Thank you!
This crochet sweater is 21” (53 cm) wide, 21,5 (55 cm) long and 15” (38 cm) sleeve length – the full 9 sizes (from XS-to 5X) can be found in the paid version.
Get the free pattern BELOW!
Sizes available in the paid version:
If you like my work and want to support me, or you’re interested in purchasing full version of this pattern (including all sizes from XS to 5X) in a downloadable, printable PDF format, it is available for purchase on my Payment Page below.
Any Worsted Weight (4) Yarn Pistachio green 200g Black 200g White 200g This yardage is approximate, so as the yardage will vary depends on your type of yarn
5.00mm Crochet Hook (H)
Scissors
Needle
GAUGE
Crochet Gauge Blocked (4in x 4in / 10cm) 13 sts x 10 rows = 4” in half double crochet
ABBREVIATIONS
Ch = chain Hdc = half double crochet Hdc-blo = half double crochet back loop only Hdc-slst = half double crochet slip stitch Sl st = slip stitch Sc = single crochet Blo = back loop only Sk = skip Rep = repeat Rnd = round St = stitch
FRONT BODY PANEL RIBBING
Using white yarn and crochet hook 5.00 mm (H)
ROW 1: ch 18, 1 hdc into second ch from hook and each ch across. Total of 17 st, turn
ROWS 2-47: ch 1 ( do not count as a st ), 1 hdc-blo into each st across. Total of 17 st, turn
BODY
Rotate your work, we are going to make Row 1 of the main body of the Front Panel into the ends of the rows of the ribbing.
ROW 1: Ch 1 (do not count as a st), *1 hdc in the next st, 2 hdc in next st. Repeat from * across the entire row, in the end hdc 1, turn. Total of 70 st, turn
ROWS 2-42: Ch 1 (do not count as a st), 1 Hdc-blo into each St across (See Chart A for XS), turn.
Tie off, leave a long tail for shoulder seaming.
BACK BODY PANEL RIBBING
Work the same as Front, but use Chart B
SLEEVE PANEL ( Make one Green and one Black)
Using green or black yarn and crochet hook 5.00 mm (H)
ROW 1: ch 56, 1 hdc-slst into second ch from hook, 14 hdc-slst, 40 hdc. Total of 55 st, turn
ROW 2: ch 1 ( do not count as a st ), 40 hdc-blo, 14 hdc-slst. Total of 55 st, turn
ROWS 3-24: Rep Rows 1& 2
Tie off, leave a long tail for sewing.
JOINING
Place the two body panels together and sew in the wrong side using the tail that we left earlier. Sew in 21 st per side, leaving about a 8.50 ″/ 22 cm neckhole. (Check pic 1 blue color).
If you’d like a smaller or bigger neck hole, you can sew more or less stitches from the shoulder seam.
Using the tail that we left earlier, sew the shoulder seam of the main panel which should be in the middle of the sleeves panel. (Check pic 1 orange color)
Fold your sweater in half at the shoulder seam and start sewing on the wrong side. Sew up each side of the sweater and sleeves (Check pic 2 green color).
NECKLINE
Attach green yarn to the middle of one of the neckhole sides and ch 1.
RND 1: Ch 1, Sc evenly around the opening of the neckline. Sl St to the first St to join.
RND 2: Ch 1, Sc evenly around the opening of the neckline. Sl St to the first St to join.
Tie off. Weave in all the ends.
ENJOY!
Since you like sweaters patterns, these patterns might interest you too?
Recently I added a few patterns to my sweater’s collection. They are not for a beginner, because contains tapestry crochet, but honestly they are simple. You just do half double crochet most of the project.
If you are my follower you definitly know I’am truly passionate about Chicken. That is why the Hen Sweater was one of the first.
If you’re not familiar with what I’m talking about, I’ll include a links below
Hen Hat CrochetHen Fingerless MittsHen SocksMad Hen Wall HangingChicken Pot HolderChicken Hat
Also I really like Bears!
Of course, if I accidentally met a bear in the forest or somewhere else, I wouldn’t love him so much 😁 but Bear sweater is amazing and I am really happy to wear it this fall.
These Patterns are paid, not free, don’t be disappointed and understand that this is my business, but anyway I will be glad to answer any of your questions!
If you like my work and want to support me, or you’re interested in purchasing this pattern in a downloadable, printable PDF format, it is available for purchase on my Payment Page below.
Two simple granny hexagons are the foundation. Work two identical hexagons in the circle, then work back-and-forth, adding borders. Lastly, finish off the shirt with a collar and sew the buttons.
Materials:
Any No.2 Sports weight yarn
3.50mm Crochet Hook or other to archive gauge
Scissors
Buttons
Yarn needle
Yarn needed: Brown – 250 (300, 300, 450, 450, 500, 550, 600, 600) g; Green – 50g.
GAUGE
Crochet Gauge (4in x 4in / 10cm) 23 sts x 12 rows = 4” in double crochet granny pattern
SIZES
XS, S, M, L, XL, XXL, 3X, 4X, 5X
Finished Measurements
ABBREVIATIONS
CH = chain DC = double crochet Sl St= slip stitch SC=single crochet SK=skip REP=repeat RND=round ST=stitch tch – turning chain RS – right side WS – wrong side SP – space CH1SP – the space created by chaining 1 in the previous row/round CH2SP – the space created by chaining 2 in the previous row/round CH4SP – the space created by chaining 4 in the previous row/round
Hexagons (make 2)
Using brown color, Ch 5, sl st to first ch to form a ring. (see Pic 3)
RND 1: Ch 3, 2 dc in ring, ch 2, *3 dc in ring, ch 2, Rep from * 4 times more, sl st to join, 3 sl st
RND 2: Ch 3, (2 dc, ch 2, 3 dc) all in first ch2sp, ch 1, *(3 dc, 2 ch, 3 dc) all in next ch2sp, ch 1, rep from * 4 times more, sl st to join, 3 sl st
RND 3: Ch 3, (2 dc, ch 2, 3 dc) all in first ch2sp, ch 1, 3 dc in next ch1sp, ch 1, *(3 dc, 2 ch, 3 dc) all in next ch2sp, ch 1, 3 dc in next ch1sp, ch 1; repeat from * 4 more times, sl st to join, 3 sl st into next ch2sp.
RND 4: Ch 3, (2 dc, ch 2, 3 dc) all in first ch2sp, ch 1, (3 dc, ch 1) in each ch1sp to corner, *(3 dc, 2 ch, 3 dc) all in next ch2sp, ch 1, (3 dc, ch 1) in each ch1sp to corner; repeat from * 4 more times, sl st to join, 3 sl st into next ch2sp.
Bring opposite corners of hexagon (the 1st and 4th corner, for example) together to fold the hexagon into an “L” shape with the RS facing out. Repeat with second hexagon. (Pic 4)
Right Back Panel
Turn your shirt right side out. Then start to crochet back and forth, forming back side
ROW 20 (22, 24, 26, 28, 30, 32, 34, 36) [RS]: Ch3 on the bottom corner space (pics 5,6), (2 dc, ch 1) all into first corner space, (3 dc, ch 1) into each space till next corner, 3 dc into last ch2sp, turn
ROW 21 (23, 25, 27, 29, 31, 33, 35, 37) [WS]: Ch 4, 3 dc into next ch1sp, ch 1, (3 dc, ch 1) into each ch1sp to end, ch, dc into 3rd ch of previous row, turn
ROW 22 (24, 26, 28, 30, 32, 34, 36, 38) [RS]: Ch3, (2 dc, ch 1) all in first ch1sp, (3 dc, ch 1) in each ch1sp to end, 3 dc into last ch2sp, turn
ROW 23 (25, 27, 29, 31, 33, 35, 37, 39) [WS]: Ch 4, 3 dc into next ch1sp, ch 1, (3 dc, ch 1) into each ch1sp to end, ch, dc into 3rd ch of previous row, turn
ROW 20 (22, 24, 26, 28, 30, 32, 34, 36) [RS]: Ch3 on the upper corner space (pics 7, 8), (2 dc, ch 1) all into first corner space, (3 dc, ch 1) into each space till next corner, 3 dc into last ch2sp, turn
Repeat Rows of the Right Back Panel.
Seaming
Sew on the wrong side, use which ever method you prefer to sew. Sew back seam and seams on the top of the sleeves Both sides are sewn the same. (pic 9)
Right Front Panel
Then start to crochet back and forth, forming neckline decreases
ROW 20 (22, 24, 26, 28, 30, 32, 34, 36) [RS]: Ch3 on the bottom corner space (pic 10), (2 dc, ch 1) all into first corner space, (3 dc, ch 1) into each space till next corner, dc into 3rd ch of previous row, turn
ROW 21 (23, 25, 27, 29, 31, 33, 35, 37) [WS]: Ch 4, 3 dc into next chsp (skip the first chsp), ch 1, (3 dc, ch 1) into each ch1sp to end, ch, dc into 3rd ch of previous row, turn
ROW 22 (24, 26, 28, 30, 32, 34, 36, 38) [RS]: Ch3, (2 dc, ch 1) all in first ch1sp, (3 dc, ch 1) in each ch1sp to end, dc into 3rd dc of prev rnd, turn
ROW 23 (25, 27, 29, 31, 33, 35, 37, 39) [WS]: Ch 4, 3 dc into next chsp (skip the first chsp), ch 1, (3 dc, ch 1) into each ch1sp to end, ch, dc into 3rd ch of previous row, turn
Make left panel the same as right, but work not on your right side but on the wrong side. Turn off panel right side facing down and repeat all rnds of the Right Front Panel. Fasten off. Turn off panel wrong side facing down (pic 11).
Adding Bottom Length
Size 5X don’t do any additional length, unless you want your shirt will be longer. Sizes XS, S, M, L, XL, XXL, 3X, 4X continue the rows below.
With RS of shirt facing, attach yarn at what will be the bottom, front left corner. (Pic 12)
ROW 1 [RS]: Ch3 on the bottom front left corner space, (2 dc, ch 1) all into first corner space, (3 dc, ch 1) into each space till next corner, 3 dc into last ch2sp, turn
ROW 2: [WS]: Ch 4, 3 dc into next ch1sp, ch 1, (3 dc, ch 1) into each ch1sp to end, ch, dc into 3rd ch of previous row, turn
ROW 3 [RS]: Ch3, (2 dc, ch 1) all in first ch1sp, (3 dc, ch 1) in each ch1sp to end, 3 dc into last ch4sp, turn Size 4X stop here and fasten off. Sizes XS, S, M, L, XL, XXL, 3X continue the rows below.
ROW 4: [WS]: Ch 4, 3 dc into next ch1sp, ch 1, (3 dc, ch 1) into each ch1sp to end, ch, dc into 3rd ch of previous row, turn
ROW 5 [RS]: Rep Row 3
ROW 6: [WS]: Rep Row 4 Size 3X stop here and fasten off. Sizes XS, S, M, L, XL, XXL continue the rows below.
ROW 7 [RS]: Rep Row 3 Size XXL stop here and fasten off. Sizes XS, S, M, L, XL continue the rows below.
ROW 8 [WS]: Rep Row 4
ROW 9 [RS]: Rep Row 3
ROW 10 [WS]: Rep Row 4 Sizes L, XL stop here and fasten off. Sizes XS, S, M continue the rows below.
ROW 11 [RS]: Rep Row 3
ROW 12 [WS]: Rep Row 4
ROW 13 [RS]: Rep Row 3 Size M stop here and fasten off. Sizes XS, S continue the rows below.
ROW 14 [WS]: Rep Row 4
ROW 15 [RS]: Rep Row 3 Size S stop here and fasten off. Size XS continue the rows below.
ROW 16 [WS]: Rep Row 4
ROW 17 [RS]: Rep Row 3
ROW 18 [WS]: Rep Row 4 Size XS stop here and fasten off.
Collar
Turn your shirt right side out. Crochet the collar on the right side.
Row 1 [RS]: Ch3 on the upper corner space (pic 14), (2 dc, ch 1) all in first corner space (pic 15), (3 dc, ch 1) in each space around the neck area (pic 16) and back down to the other side, 3 dc into last corner (pic 17), turn
Row 2 [WS]: Ch 4, 3 dc in the first ch1sp (pic 18), (3 dc, ch 1) in each ch1sp to end, dc into 3rd ch of previous row (pic 19), turn
Row 3 [RS]: Ch3, (2 dc, ch 1) all in first ch1sp, (3 dc, ch 1) in each ch1sp to end, 3 dc into last ch4sp, turn
Row 4 [WS]: Ch 4, 3 dc in the first ch1sp, (3 dc, ch 1) in each ch1sp to end, dc in 3rd ch of previous row, turn
Repeat 3&4 rows for 10 rows or desired length.
Fasten off. Weave in all the ends.
Collar and Bottom Edge Trim
With RS of shirt facing, attach green yarn at what will be the upper front left corner. (Pic 20)
Row 1 [RS]: Ch on the upper corner space (pic 21), sc (pic 22), *ch3 (pic 23), dc 3 in the space (pic 24), sc in next space (pic 25), rep from * till corner ( ch 3, dc 3, sc in the same space, ch3, dc3, sc in next space (pic 26), then repeat till end (pic 28)
Fasten off. Weave in all the ends.
Adding the Buttons
The placement of the buttons will depend on how you want your shirt to fit.
Sew the buttons into the left front panel (when you’re wearing it) (pic 28).
Adding the Pockets
Crochet the pockets on the right side. Count 16 (17, 19, 20, 23, 24, 27, 28, 28) stitches and attach yarn. (Pic 29)
Row 1 [RS]: Ch3, (2 dc, ch 1) all in first space (pic 30), (3 dc, ch 1) in next 6 (7, 7, 8, 8, 9, 9, 10, 11) spaces, turn (pic 31). Total of 27 (31, 31, 35, 35, 39, 39, 43, 47) st
Row 2 [WS]: Ch 4, 3 dc in the first ch1sp, (3 dc, ch 1) in each ch1sp to end, dc in 3rd ch of previous row, turn
Row 3 [RS]: Ch3, (2 dc, ch 1) all in first space (pic 32), (3 dc, ch 1) till end, 3 dc into last ch4sp, turn
Rep rows2&3 following the colour sequence
For XS, S, M, L 1-4 rows: brown 5-6 rows: green 7-8 rows: brown 9-10 rows: green 11-14 rows: brown
For XL, 2X, 3X, 4X, 5X 1-6 rows: brown 7-8 rows: green 9-10 rows: brown 11-12 rows: green 13-18 rows: brown
Fasten off, Weave in ends. ENJOY!
Copyright notice: You may not reproduce any of the photos or the text without obtaining written permission from me first. Thank you!
This is super easy and fast crochet cardigan, perfect for beginner crocheters!
It probably looks complicated, but this crochet cardigan is actually two simple granny hexagons. It’s just double crochet and space. So easy!!!
If you like my work and want to support me, or you’re interested in purchasing this pattern in a downloadable, printable PDF format, it is available for purchase on my Payment Page below.
Two simple granny hexagons are the foundation. Work two identical hexagons in the circle, then work back-and-forth, adding length and wide (excluding sleeves). Lastly, finish off the cardigan with a collar and sew the buttons.
Materials:
Any Super bulky (5-6 wpi) velvet yarn I used Himalaya Dolphin Baby (100% Polyester) 131 yds/3.53oz-100g (120 m/100g) Green – 2 (2, 3, 3) skeins; White – 6 (8, 10, 12) skeins; Yarn needed: 1050(1300, 1700, 2000) Yards/ 800 (1000, 1300, 1500)g
6.0mm Crochet Hook = US J/10 or other to archive gauge
Scissors
Yarn needle
Buttons
Gauge
Crochet Gauge (4in x 4in / 10cm) 9 sts x 5 rows = 4” in double crochet granny pattern
SIZES
XS/S, M/L, XL/XXL, 3X/4X
Finished Measurements
You can easily adjust the size: to make a smaller sweater, crochet smaller hexagons. To make a larger sweater, crochet larger hexagons.
ABBREVIATIONS
CH = chain DC = double crochet Sl St= slip stitch SK=skip REP=repeat RND=round ST=stitch tch – turning chain RS – right side WS – wrong side SP – space CH1SP – the space created by chaining 1 in the previous row/round CH2SP – the space created by chaining 2 in the previous row/round CH4SP – the space created by chaining 4 in the previous row/round
Right FRONT AND BACK PIECE
Body
Using white color, Ch 5, sl st to first ch to form a ring. RND 1: Ch 3, 2 dc in ring, ch 2, *3 dc in ring, ch 2, Rep from * 4 times more, sl st to join, 3 sl st
RND 2: Ch 3, (2 dc, ch 2, 3 dc) all in first ch2sp, ch 1, *(3 dc, 2 ch, 3 dc) all in next ch2sp, ch 1, rep from * 4 times more, sl st to join, 3 sl st.
RND 3: Ch 3, (2 dc, ch 2, 3 dc) all in first ch2sp, ch 1, 3 dc in next ch1sp, ch 1, *(3 dc, 2 ch, 3 dc) all in next ch2sp, ch 1, 3 dc in next ch1sp, ch 1; repeat from * 4 more times, sl st to join, 3 sl st into next ch2sp.
RND 4: Ch 3, (2 dc, ch 2, 3 dc) all in first ch2sp, ch 1, (3 dc, ch 1) in each ch1sp to corner, *(3 dc, 2 ch, 3 dc) all in next ch2sp, ch 1, (3 dc, ch 1) in each ch1sp to corner; repeat from * 4 more times, sl st to join, 3 sl st into next ch2sp.
In RNDS/ROWS 5, 10, 15 and etc make color changing – crochet green color
RNDS 5-12(14,16,18): Repeat Rnd 4
Then start to crochet back and forth, forming decreasing neckline
ROW 13 (15, 17, 19) [RS]: Ch3, (2 dc, ch 1) all in first ch2sp, (3 dc, ch 1) in each ch1sp to corner, (3 dc, 2 ch, 3 dc) all in next ch2sp, ch 1, (3 dc, ch 1) in each ch1sp to corner, (3 dc, 2 ch, 3 dc) all in next ch2sp, ch 1, (3 dc, ch 1) in each ch1sp to corner, 1 dc in last ch2sp, turn
ROW 14 (16, 18, 20) [WS]: Ch4, skip first chsp, (3 dc, ch 1) in each ch1sp to corner, (3 dc, 2 ch, 3 dc) all in next ch2sp, ch 1, (3 dc, ch 1) in each ch1sp to corner, (3 dc, 2 ch, 3 dc) all in next ch2sp, ch 1, (3 dc, ch 1) in each ch1sp to corner, dc in the 3rd chain (top) of the turning ch3 of the previous row, turn
ROW 15 (17, 19, 21) [RS]: Ch3, (2 dc, ch 1) all in first chsp, (3 dc, ch 1) in each ch1sp to corner, (3 dc, 2 ch, 3 dc) all in next ch2sp, ch 1, (3 dc, ch 1) in each ch1sp to corner, (3 dc, 2 ch, 3 dc) all in next ch2sp, ch 1, (3 dc, ch 1) in each ch1sp to corner, 1 dc in last ch4sp (ch4 of the previous row), turn
ROW 16 (18, 20, 22) [WS]: Ch4, skip first chsp, (3 dc, ch 1) in each ch1sp to corner, (3 dc, 2 ch, 3 dc) all in next ch2sp, ch 1, (3 dc, ch 1) in each ch1sp to corner, (3 dc, 2 ch, 3 dc) all in next ch2sp, ch 1, (3 dc, ch 1) in each ch1sp to corner, dc in the 3rd chain (top) of the turning ch3 of the previous row, turn
Sizes XS/S stop here and fasten off. Sizes M/L, XL/XXL, 3X/4X continue the rows below.
ROW __ (19, 21, 23) [RS]: Rep Row 15 (17, 19, 21)
ROW __ (20, 22, 24) [WS]: Rep 16 (18, 20, 22)
Sizes M/L, stop here and fasten off. Sizes XL/XXL, 3X/4X continue the rows below.
ROW __ (__, 23, 25) [RS]: Rep Row 15 (17, 19, 21)
ROW __ (__, 24, 26) [WS]: Rep Row 16 (18, 20, 22)
Sizes XL/XXL, stop here and fasten off. Sizes 3X/4X continue the rows below.
ROW __ (__,__ , 27) [RS]: Rep Row 15 (17, 19, 21)
ROW __ (__,__ , 28) [WS]: Rep 16 (18, 20, 22)
Fasten off.
Left FRONT AND BACK PIECE
Crochet left panel the same as right, but make your right side – wrong side (leave ends on the other side). (see pic 3)
So ROW 13 (15, 17, 19) will be wrong side [WS],
ROW 14 (16, 18, 20) [RS] and etc
Joining
Place your panels right side facing down. Sew on the wrong side, use which ever method you prefer to sew. Sew back seam and seams on the top of the sleeves Both sides are sewn the same. (pic 4)
Collar
Turn your cardigan right side out. Crochet the collar on the right side.
Row 1 [RS]: Ch3 on the upper corner space (pic 5), (2 dc, ch 1) all in first corner space (pic 6), (3 dc, ch 1) in each space around the neck area and back down to the other side, turn
Row 2 [WS]: Ch 4, 3 dc in the first ch1sp, (3 dc, ch 1) in each ch1sp to end, turn
Row 3 [RS]: Ch3, (2 dc, ch 1) all in first ch1sp, (3 dc, ch 1) in each ch1sp to end, turn
Row 4 [WS]: Ch 4, 3 dc in the first ch1sp, (3 dc, ch 1) in each ch1sp to end. Fasten off (pic 7). Weave in all the ends.
Here’s the video tutorial for this Hexagon Blanket Cardigan Crochet Pattern
Copyright notice: You may not reproduce any of the photos or the text without obtaining written permission from me first. Thank you!
For creation these crochet top I was inspired by the astonishingly beautiful water lilies pond. White, soft pink flowers shining on the water surface of the pond, framed by magnificent green leaves. Beautiful, isn’t it? 😊
This is a very simple beginner friendly project. You have to know the basis: how to chain, slip stitch, single crochet and double crochet, no any decreases or increases. Super super EASY!
If you like my work and want to support me, or you’re interested in purchasing this pattern in a downloadable, printable PDF format, it is available for purchase on my Payment Page below.
It’s a very easy two piece construction that’s sewn together after.
This is a crop top pattern. Add rows for a longer fitting top.
Materials:
Any No.2 Sports weight yarn I used Alize Cotton Gold No.2 (55% cotton, 45% acrylic) 361 yds/3.53 oz (330 m/100 g) Asparagus (103) – 1 skein; Ballerina Pink (518) – 1 skein; Nude (401) – 1 skein; White (55) – 1 skein; Any Grey (with lurex) yarn – 1 skein;
2.50mm Crochet Hook or other to archive gauge
Scissors
Yarn needle
Yarn needed: 630(690, 780, 830, 930, 1000) Yards
Gauge
Crochet Gauge (4in x 4in / 10cm) (blocked) 21 sts x 15 rows remember to check your gauge!
ABBREVIATIONS
CH = chain SC = single crochet DC = double crochet Sl St= slip stitch SK=skip REP=repeat ST=stitch
SIZES
XS, S, M, L, XL, XXL
Finished Measurements (after blocked)
Panels (make 2)
Body
Make the base chain 91 (99, 107, 117, 129, 139). The first 87 (95, 103, 113, 125, 135) chain stitches make the foundation chain, while the last 3 make the turning chain) in Asparagus (green) color. Total 88, 96, 104, 114, 126, 136 sts in row.
ROW 1 [RS]: DC into the fourth chain from the hook and work 1 DC into each of the next 87 (95, 103, 113, 125, 135) sts, turn ROW 2 [WS]: CH 1 (doesn’t count as first st), SC in each of next 88 (96, 104, 114, 126, 136) sts, turn
Rows 3-38(40,44,46,48,52): Repeat Rows 1-2. For a longer length top, add more rows here. Repeat rows 1-2 until desired length is reached. You’ll have a total of 38(40,44,46,48,52) rows
For color changing, you can follow this chart or make your own (see pic 2) When you crochet grey with lurex yarn on RS side, crochet the mesh: Using Grey with lurex yarn [any RS row]: *DC, CH, skip the next st, DC in next st, repeat from * (see the pic 2.1)
Straps (right shoulder, left when worn)
In the following row we will only be working partially across and leaving the remaining Sts unworked.
Row 39(41,45,47,49,53) [RS]: skip 15(17,19,21,23,26) CH 3 in next st (count as first DC), DC in the next 15 (15, 15, 15, 17, 17) st, turn. (16 (16,16,16,18,18) sts)
Row 40(42,46,48,50,54) [WS]: CH 1 (doesn’t count as first st), SC in each of next 16 (16, 16, 16, 18, 18) sts, turn. (16 (16,16,16,18,18) sts)
Row 41(43,47,49,51,55) [RS]: CH 3 in next st (count as first DC), DC in the next 15 (15, 15, 15, 17, 17) st, turn. (16 (16,16,16,18,18) sts)
Repeat previous 2 rows. You will end on a Row 60(64, 68, 70, 76, 78) Fasten off.
Straps (left shoulder, right when worn)
Lay your panel out with the completed shoulder on the right hand side. You will be leaving 57 ( 63, 69, 77, 85, 92) Sts unworked at the center neckline. Counting over from the last St made in Row 39(41, 45, 47, 49, 53) of the first shoulder.
Row 39(41,45,47,49,53) [RS]: skip 28(32,136,42,46,50) sts, CH 3 in next st (count as first DC), DC in the next 15 (15, 15, 15, 17, 17) st, turn. (16 (16,16,16,18,18) sts)
Row 40(42,46,48,50,54) [WS]: CH 1 (doesn’t count as first st), SC in each of next 16 (16, 16, 16, 18, 18) sts, turn. (16 (16,16,16,18,18) sts)
Row 41(43,47,49,51,55) [RS]: CH 3 in next st (count as first DC), DC in the next 15 (15, 15, 15, 17, 17) st, turn. (16 (16,16,16,18,18) sts)
Repeat previous 2 rows. You will end on a Row 60(64, 68, 70, 76, 78)
Fasten off, leave a long tail for seaming.
Joining
Place your back and front panels together, RS facing. Sew the straps together using your seaming method of choice. Next, sew down the sides of the top using the same method. Be sure to line the back and front panel up evenly. (pic 3)
Neckline, Arm Hole and Bottom Edge Trim
Using Asparagus green yarn (or any you like) add a shell border. (pic 4)
Neckline Trim
With your top right side facing out, join yarn to one of the shoulder seams with a Sl St. (pic 5)
Rnd 1: CH 1 (do not count as a st), 1 slip stitch into the same st, * skip 2 sts, Work 7 DC into the next st, skip 2 sts, sl st in the next stitch to create the shell. Repeat from * evenly around the neck opening. Join to the first Sc with a Sl St. Fasten off and weave in all ends.
When you get to the place where you did your first st and you have a few less or more st to finish the shell, it’s ok, just undo some stistches and then crochet them again, slipping or adding a few stitches to achieve the pattern. (pic 5)
Arm Hole Trim
With your top right side facing out, join yarn with a Sl St to the seam at the underarm. (pic 6)
Rnd 1: CH 1 (do not count as a st), 1 slip stitch into the same st, * skip 2 sts, Work 7 DC into the next st, skip 2 sts, sl st in the next stitch to create the shell. Repeat from * evenly around opening of arm. Join to the first Sc with a Sl St. Fasten off and repeat on other side.
Bottom Trim
With your top RS out, join yarn with a Sl St to the bottom hem. (pic 7)
Rnd 1: CH 1 (do not count as a st), 1 slip stitch into the same st, * skip 2 sts, Work 7 DC into the next st, skip 2 sts, sl st in the next stitch to create the shell. Repeat from * evenly around. Join to the first Sc with a Sl St. Fasten off and weave in all ends.
Copyright notice: You may not reproduce any of the photos or the text without obtaining written permission from me first. Thank you!
What are you thinking about looking at this majestic red bird?
My thoughts – how beautiful!😊
And whatever you think about the cardinal bird, you have the opportunity to crochet this hat for Adult (22-23”/56-58 cm) / Adult XL (24-25”/60-64 cm) sizes right now and absolutely free.
If you’re interested in purchasing this crochet hat pattern or any of my other patterns in a downloadable, printable PDF format, they’re available for purchase on my Payment Page below.
13 x 16 cm 4 x 4 inch = 13 stitches in width and 16 rows in height with split single crochet (hook 5 mm)
ABBREVIATIONS
CH = chain SC = single crochet SSC = split single crochet SSC2tog = split single crochet decrease BLO = back loop only SK=skip SL ST = slip stitch YO=yarn over REP=repeat ST=stitch RS= rigth side WS=wrong side
SHORT OVERVIEW
The hat is worked in the round with a hook, bottom-up. First work a single crochet ribbing, then work split single crochet along the edge of the ribbing in rounds. A pom is attached to the top.
Adult (22-23’/56-58 cm)
RIBBING:
Make the base chain 22+1 in Green on hook 4.0mm (G hook). ROW 1 [RS]: SC in 2nd ch from the hook, work SC in each chain until end, turn. (22 sts) ROW 2 [WS]: Ch 1, Blo SC in each st until end, turn (22 sts)
Repeat ROW 2 until ROW 80.
Join last row to beginning row by slip stitching through blo of first and last row at the same time with the WS facing, and working from the bottom of the hat body to the outer edge.
Body of hat:
Now crochet the body of the hat across the edge of the band, (using 5 mm H hook). Hat is worked in a continuous spiral so there is no visible seam.
ROUND 1: Ch 1, place a SC in each row of the band. (80 sts) (see Chart A, noting 16 st rep will be worked 5 times) (Chart A is included in the paid PDF file), but you could use written pattern (below) Green x 80 (80 sts total)
ROUND 2: SSC in 1st st of ROUND 1, to mark the beginning of the round place stitch marker in 1st st of ROUND 1. SSC in each st of the round, following the chart for colour changes. White x 2, *Red x 3, White x 13, Rep from* 4 times more, Red x 3, White x 11 (80 sts total)
ROUNDS 3-6: SSC in each st in the round, following the chart for the colour changes. White x 2, *Red x 3, White x 13, Rep from* 4 times more, Red x 3, White x 11 (80 sts total)
ROUND 7 SSC in each st in the round, following the chart for the colour changes *Brown x 2, Red x 3, Brown x 2, White x 9, Rep from* 4 times more, (80 sts total)
ROUND 8 *White x 1, Red x 5, Brown x 5, White x 3, Green x 2, Rep from* 4 times more, (80 sts total)
ROUND 9 *Red x 7, Brown x 3, White x 3, Green x 3, Rep from* 4 times more, (80 sts total)
ROUND 10 *Red x 8, White x 1, Brown x 2, White x 2, Green x 2, White x 1, Rep from* 4 times more, (80 sts total)
ROUND 11 *Red x 9, White x 1, Brown x 3, White x 3, Rep from* 4 times more, (80 sts total)
ROUND 12 *Red x 9, White x 2, Brown x 3, White x 2, Rep from* 4 times more, (80 sts total)
ROUND 13 *Red x 10, White x 2, Green x 1, White x 3, Rep from* 4 times more, (80 sts total)
ROUND 14 *Red x 10, White x 2, Green x 2, White x 2, Rep from* 4 times more, (80 sts total)
ROUND 15 *Red x 10, White x 2, Green x 3, White x 1, Rep from* 4 times more, (80 sts total)
ROUND 16 White x 1, *Red x 9, White x 3, Green x 2, White x 2 Rep from* 4 times more, Red x 9, White x 3, Green x 2, White x 1 (80 sts total)
ROUND 17 White x 1, *Red x 8, White x 8 Rep from* 4 times more, Red x 8, White x 7 (80 sts total)
ROUND 18 White x 2, *Red x 6, Black x 1, Yellow x 1, White x 8, Rep from* 4 times more, Red x 6, Black x 1, Yellow x 1, White x 6 (80 sts total)
ROUND 19 White x 3, *Red x 4, Black x 1, Yellow x 3, White x 8, Rep from* 4 times more, Red x 4, Black x 1, Yellow x 3, White x 5 (80 sts total)
ROUND 20 White x 3, *Red x 4, Black x 2, Yellow x 1, White x 9, Rep from* 4 times more, Red x 4, Black x 2, Yellow x 1, White x 6 (80 sts total)
ROUND 21 White x 4, *Red x 5, White x 11, Rep from* 4 times more, Red x 5, White x 7 (80 sts total)
ROUND 22 White x 5, *Red x 3, White x 13, Rep from* 4 times more, Red x 3, White x 8 (80 sts total)
ROUND 23 White x 5, *Red x 2, White x 114, Rep from* 4 times more, Red x 2, White x 9 (80 sts total)
ROUND 24 White x 5, *Red x 1, White x 15, Rep from* 4 times more, Red x 1, White x 10 (80 sts total)
ROUNDS 25-30 White x 80 (80 sts total)
Chart A is included in the paid PDF file
Shape top:
ROUND 31: *SSC2tog,SSC2; rep from * around. (60sts) (see Chart B)
ROUND 32: *SSC2tog,SSC; rep from * around. (40 sts)
ROUND 33: *SSC2tog; rep from * around. (20 sts)
Whip stitch around top opening of the beanie (approx. 1 stitch of each SC2tog). Pull tight on the tail of yarn and sew the hole closed. Sew the Pom
Weave in all of your ends.
POM POM:
Make one pom pom with White, orange (or any other, if you like) and a diameter of approx 7-8cm. Sew the pom pom to the top of the hat.
Adult XL(24-25’/60-64 cm)
RIBBING:
Make the base chain 24+1 in Green on hook 4.0mm (G hook). ROW 1 [RS]: SC in 2nd ch from the hook, work SC in each chain until end, turn. (24 sts) ROW 2 [WS]: Ch 1, Blo SC in each st until end, turn (24 sts)
Repeat ROW 2 until ROW 96.
Join last row to beginning row by slip stitching through blo of first and last row at the same time with the WS facing, and working from the bottom of the hat body to the outer edge.
Body of hat:
Now crochet the body of the hat across the edge of the band, (using 5 mm H hook). Hat is worked in a continuous spiral so there is no visible seam.
ROUND 1: Ch 1, place a SC in each row of the band. (96 sts) (see Chart A, noting 16 st rep will be worked 6 times)
(Chart A is included in the paid PDF file), but you could use written pattern (below)
Green x 96 (96 sts total)
ROUND 2: SSC in 1st st of ROUND 1, to mark the beginning of the round place stitch marker in 1st st of ROUND 1. SSC in each st of the round, following the chart for colour changes. White x 2, *Red x 3, White x 13, Rep from* 5 times more, Red x 3, White x 11 (96 sts total)
ROUNDS 3-6: SSC in each st in the round, following the chart for the colour changes. White x 2, *Red x 3, White x 13, Rep from* 5 times more, Red x 3, White x 11 (96 sts total)
ROUND 7 SSC in each st in the round, following the chart for the colour changes *Brown x 2, Red x 3, Brown x 2, White x 9, Rep from* 5 times more, (96 sts total)
ROUND 8 *White x 1, Red x 5, Brown x 5, White x 3, Green x 2, Rep from* 5 times more, (96 sts total)
ROUND 9 *Red x 7, Brown x 3, White x 3, Green x 3, Rep from* 5 times more, (96 sts total)
ROUND 10 *Red x 8, White x 1, Brown x 2, White x 2, Green x 2, White x 1, Rep from* 5 times more, (96 sts total)
ROUND 11 *Red x 9, White x 1, Brown x 3, White x 3, Rep from* 5 times more, (96 sts total)
ROUND 12 *Red x 9, White x 2, Brown x 3, White x 2, Rep from* 5 times more, (96 sts total)
ROUND 13 *Red x 10, White x 2, Green x 1, White x 3, Rep from* 5 times more, (96 sts total)
ROUND 14 *Red x 10, White x 2, Green x 2, White x 2, Rep from* 5 times more, (96 sts total)
ROUND 15 *Red x 10, White x 2, Green x 3, White x 1, Rep from* 5 times more, (96 sts total)
ROUND 16 White x 1, *Red x 9, White x 3, Green x 2, White x 2 Rep from* 5 times more, Red x 9, White x 3, Green x 2, White x 1 (96 sts total)
ROUND 17 White x 1, *Red x 8, White x 8 Rep from* 5 times more, Red x 8, White x 7 (96 sts total)
ROUND 18 White x 2, *Red x 6, Black x 1, Yellow x 1, White x 8, Rep from* 5 times more, Red x 6, Black x 1, Yellow x 1, White x 6 (96 sts total)
ROUND 19 White x 3, *Red x 4, Black x 1, Yellow x 3, White x 8, Rep from* 5 times more, Red x 4, Black x 1, Yellow x 3, White x 5 (96 sts total)
ROUND 20 White x 3, *Red x 4, Black x 2, Yellow x 1, White x 9, Rep from* 5 times more, Red x 4, Black x 2, Yellow x 1, White x 6 (96 sts total)
ROUND 21 White x 4, *Red x 5, White x 11, Rep from* 4 times more, Red x 5, White x 7 (80 sts total)
ROUND 22 White x 5, *Red x 3, White x 13, Rep from* 5 times more, Red x 3, White x 8 (96 sts total)
ROUND 23 White x 5, *Red x 2, White x 114, Rep from* 5 times more, Red x 2, White x 9 (96 sts total)
ROUND 24 White x 5, *Red x 1, White x 15, Rep from* 5 times more, Red x 1, White x 10 (96 sts total)
ROUNDS 25-33 White x 96 (96 sts total)
Shape top:
ROUND 34: *SSC2tog,SSC2; rep from * around. (72 sts) (see Chart B)
ROUND 35: *SSC2tog,SSC; rep from * around. (48 sts)
ROUND 36: *SSC2tog; rep from * around. (24 sts)
Whip stitch around top opening of the beanie (approx. 1 stitch of each SC2tog). Pull tight on the tail of yarn and sew the hole closed. Sew the Pom
Weave in all of your ends.
POM POM: Make one pom pom with White, orange (or any other, if you like) and a diameter of approx 7-8cm. Sew the pom pom to the top of the hat.
Copyright notice:
You may not reproduce any of the photos or the text without obtaining written permission from me first. Thank you!
Hi there, if you’re here for your first time, welcome! I just finished a new crochet tee pattern.
So as the pattern contains tapestry crochet it is considered that this is not for very very beginner, but tapestry crochet only uses basic stitches, such as single crochet, half double crochet, or double crochet. So, this technique is totally accessible to beginner crocheters.
It’s a simple two panel project, but you still end up with cute summer crochet top / vest.
And to decorate the edges I recommend to do a blanket stitch edging and create the eyelashes (optional).
If you’re interested in purchasing this crochet tee pattern or any of my other patterns in a downloadable, printable PDF format, they’re available for purchase on my Payment Page below.
A pattern is created in the fabric by changing yarn/colors multiple times within a row By following a chart where each square represents a double crochet, you will know when to change colors
I recommend to highlighte your size to avoid mistakes.
Materials:
Yarn Weight 2: Fine-Sport ( I used yarn with lurex) Grey 200 (250,250,300,300,350,350,400,400) g or 700 (875, 875, 10501 1050, 1225,1225,1400, 1400) yards
Black 50g or 175 yards
Pink 50g or 175 yards
A little bright pink for blanket stitch
2.50mm Crochet Hook or other to archive gauge
Yarn Needle
Gauge
Crochet Gauge (4in x 4in / 10cm) (blocked) 20 x 11 in Double Crochet remember to check your gauge!
Sizes:
XS/S, M/ L, XL/ 2X, 3X/ 4X
Finished Measurements:
ABBREVIATIONS
CH = chain SC = single crochet DC = double crochet HDC = half double crochet Sl St= slip Stitch DC2Tog = double crochet two together SK=skip REP=repeat ST=stitch RL= reading rows from right to left LR=reading rows from left to right
Front Panel
Make the base chain 102 (122, 142, 162). The first 99 (119, 139, 159) chain stitches make the foundation chain, while the last 3 make the turning chain) in gray color.
ROW1: DC into the fourth chain from the hook and work 1 DC into each of the next 99 (119, 139, 159) sts, turn ROW 2: CH3 (counts as first st), DC in each of next 99 (119, 139, 159) sts, turn
XS/S, M/L: No rows ROWS 3-4: CH3 (counts as first st), DC in each of next __ (__, 139, 159) sts, turn
XS/S, M/L, XL/2X: No rows ROWS 5-6: CH3 (counts as first st), DC in each of next __ (__, __,159) sts, turn
Then crochet Tapestry pattern (see the written pattern and Graph)
Tapestry pattern (Graph XS/S, M/L, XL/2X, 3X/4X)
ROWS 1-2: Gray x 100 (120, 140, 160), turn ROW 3 [RL]: Gray x 29 (39, 49, 59), Black x 10, Gray x 61 (71, 81, 91), turn ROW 4 [LR]: Gray x 57 (67, 77, 87), Black x 14, Gray x 29 (39, 49, 59), turn ROW 5 [RL]: Gray x 38 (48, 58, 68), Black x 6, Gray x 56 (66, 76, 86), turn ROW 6 [LR]: Gray x 55 (65, 75, 85), Black x 5, Gray x 40 (50, 60, 70), turn ROW 7 [RL]: Gray x 41 (51, 61, 71), Black x 4, Gray x 55 (65, 75, 85), turn ROW 8 [LR]: Gray x 55 (65, 75, 85), Black x 4, Gray x 41 (51, 61, 71), turn ROW 9 [RL]: Gray x 41 (51, 61, 71), Black x 5, Gray x 54 (64, 74, 84), turn ROW 10 [LR]: Gray x 54 (64, 74, 87), Black x 13, Gray x 33 (43, 53, 63), turn ROW 11 [RL]: Gray x 28 (38, 48, 58), Black x 18, Gray x 54 (64, 74, 84), turn ROW 12 [LR]: Gray x 54 (64, 74, 84), Black x 3, Gray x 9, Black x 9, Gray x 25 (35, 45, 55), turn ROW 13 [RL]: Gray x 24 (34, 44, 54), Black x 5, Gray x 13, Black x 4, Gray x 54 (64, 74, 84), turn ROW 14 [LR]: Gray x 53 (63, 73, 83), Black x 24, Gray x 23 (33, 43, 53), turn ROW 15 [RL]: Gray x 23 (33, 43, 53), Black x 24, Gray x 53 (63, 73, 83), turn ROW 16 [LR]: Gray x 52 (62, 72, 82), Black x 5, Gray x 13, Black x 5, Gray x 25 (35, 45, 55), turn ROW 17 [RL]: Gray x 27 (37, 47, 57), Black x 8, Gray x 9, Black x 4, Gray x 52 (62, 72, 82), turn ROW 18 [LR]: Gray x 51 (61, 71, 81), Black x 19, Gray x 30 (40, 50, 60), turn ROW 19 [RL]: Gray x 34 (44, 54, 64), Black x 15, Gray x 51 (61, 71, 81), turn ROW 20 [LR]: Gray x 50 (60, 70, 80), Black x 5, Gray x 45 (55, 65, 75), turn ROW 21 [RL]: Gray x 45 (55, 65, 75), Black x 6, Gray x 49 (59, 69, 79), turn ROW 22 [LR]: Gray x 33 (43, 53, 63), Black x 21, Gray x 46 (56, 66, 76), turn ROW 23 [RL]: Gray x 14 (24, 34, 44), Pink x 15, Gray x 19, Black x 21, Gray x 31 (41, 51, 61), turn ROW 24 [LR]: Gray x 30 (40, 50, 60), Black x 19, Gray x 21, Pink x 19, Gray x 11 (21, 31, 41), turn ROW 25 [RL]: Gray x 9 (19, 29, 39), Pink x 23, Gray x 34, Black x 4, Gray x 30 (40, 50, 60), turn ROW 26 [LR]: Gray x 30 (40, 50, 60), Black x 3, Gray x 34, Pink x 25, Gray x 8 (18, 28, 38), turn ROW 27 [RL]: Gray x 7 (17, 27, 37), Pink x 28, Gray x 32, Black x 4, Gray x 29 (39, 49, 59), turn ROW 28 [LR]: Gray x 29 (39, 49, 59), Black x 4, Gray x 31, Pink x 30, Gray x 6 (16, 26, 36), turn ROW 29 [RL]: Gray x 6 (16, 26, 36), Pink x 30, Gray x 31, Black x 4, Gray x 29 (39, 49, 59), turn ROW 30 [LR]: Gray x 29 (39, 49, 59), Black x 4, Gray x 31, Pink x 30, Gray x 6 (16, 26, 36), turn ROW 31 [RL]: Gray x 7 (17, 27, 37), Pink x 29, Gray x 31, Black x 4, Gray x 29 (39, 49, 59), turn ROW 32 [LR]: Gray x 29 (39, 49, 59), Black x 4, Gray x 32, Pink x 28, Gray x 7 (17, 27, 37), turn ROW 33 [RL]: Gray x 8 (18, 28, 38), Pink x 27, Gray x 32, Black x 4, Gray x 29 (39, 49, 59), turn ROW 34 [LR]: Gray x 29 (39, 49, 59), Black x 4, Gray x 33, Pink x 24, Gray x 10 (20, 30, 40), turn ROW 35 [RL]: Gray x 12 (22, 32, 42), Pink x 20, Gray x 35, Black x 4, Gray x 29 (39, 49, 59), turn ROW 36 [LR]: Gray x 29 (39, 49, 59), Black x 4, Gray x 39, Pink x 12, Gray x 16 (26, 36, 46), turn ROW 37 [RL]: Gray x 67 (77, 87, 97), Black x 4, Gray x 29 (39, 49, 59), turn ROW 38 [LR]: Gray x 29 (39, 49, 59), Black x 4, Gray x 67 (77, 87, 97), turn ROW 39 [RL]: Gray x 32 (42, 52, 62), Black x 16, Gray x 19, Black x 4, Gray x 29 (39, 49, 59), turn ROW 40 [LR]: Gray x 29 (39, 49, 59), Black x 4, Gray x 15, Black x 25, Gray x 27 (37, 47, 57), turn ROW 41 [RL]: Gray x 24 (34, 44, 54), Black x 10, Gray x 12, Black x 8, Gray x 13, Black x 4, Gray x 29 (39, 49, 59), turn ROW 42 [LR]: Gray x 29 (39, 49, 59), Black x 4, Gray x 13, Black x 5,Gray x 19, Black x 6, Gray x 24 (34, 44, 54), turn ROW 43 [RL]: Gray x 67 (77, 87, 97), Black x 4, Gray x 29 (39, 49, 59), turn ROW 44 [LR]: Gray x 29 (39, 49, 59), Black x 4, Gray x 67 (77, 87, 97), turn ROW 45 [RL]: Gray x 67 (77, 87, 97), Black x 4, Gray x 29 (39, 49, 59), turn ROW 46 [LR]: Gray x 29 (39, 49, 59), Black x 4, Gray x 67 (77, 87, 97), turn ROW 47 [RL]: Gray x 67 (77, 87, 97), Black x 4, Gray x 29 (39, 49, 59), turn ROW 48 [LR]: Gray x 29 (39, 49, 59), Black x 4, Gray x 67 (77, 87, 97), turn ROW 49 [RL]: Gray x 67 (77, 87, 97), Black x 4, Gray x 29 (39, 49, 59), turn ROW 50 [LR]: Gray x 30 (40, 50, 60), Black x 3, Gray x 67 (77, 87, 97), turn
For M/L, XL/2X, 3X/4X only ROW 51 [RL]: Gray x _ (120, 140, 160), turn ROW 52 [LR]: Gray x _ (120, 140, 160), turn ROW 53 [RL]: Gray x _ (120, 140, 160), turn ROW 54 [LR]: Gray x _ (120, 140, 160), turn
In the last row place the marker to indicate the middle of the row: 50 (60, 70, 80), place the marker 50 (60, 70, 80)
Neckline
XS/S, M/L, XL/2X, 3X/4X ROW 1 [RL]: CH3, work 1 DC in each St until 10 stitches remain before the marker, 2 HDC, 2 SC, 12 Sl St, 2 SC, 2 HDC, DC till end, turn ROW 2 [LR]: CH3, work 1 DC in each St until 15 stitches remain before the marker, 2 HDC, 2 SC, 22 Sl St, 2 SC, 2 HDC, DC till end, turn ROW 3 [RL]: CH3, work 1 DC in each St until 20 stitches remain before the marker, 2 HDC, 2 SC, 32 Sl St, 2 SC, 2 HDC, DC till end, turn
For M/L, XL/2X, 3X/4X Only ROW 4 [LR]: CH3, work 1 DC in each St until 25 stitches remain before the marker, 2 HDC, 2 SC, 42 Sl St, 2 SC, 2 HDC, DC till end, turn ROW 5 [RL]: CH3, work 1 DC in each St until 30 stitches remain before the marker, 2 HDC, 2 SC, 52 Sl St, 2 SC, 2 HDC, DC till end, turn
For XL/2X, 3X/4X Only ROW 6 [LR]: CH3, work 1 DC in each St until 35 stitches remain before the marker, 2 HDC, 2 SC, 62 Sl St, 2 SC, 2 HDC, DC till end, turn ROW 7 [RL]: CH3, work 1 DC in each St until 40 stitches remain before the marker, 2 HDC, 2 SC, 72 Sl St, 2 SC, 2 HDC, DC till end, turn
For 3X/4X Only ROW 8 [LR]: CH3, work 1 DC in each St until 45 stitches remain before the marker, 2 HDC, 2 SC, 82 Sl St, 2 SC, 2 HDC, DC till end, turn ROW 9 [RL]: CH3, work 1 DC in each St until 50 stitches remain before the marker, 2 HDC, 2 SC, 92 Sl St, 2 SC, 2 HDC, DC till end, turn
Split Neckline (left shoulder, right when worn)
In the following row we will only be working partially across and leaving the remaining Sts unworked.
ROW 4 (6,8,10): CH 3, work 1 DC in each of next 27 (27, 27, 27) Sts, DC2Tog, turn ROW 5 (7,9,11): DC2Tog, work 1 DC in each of next 26 (26, 26, 26) Sts, turn ROW 6 (8,10,12): CH 3, work 1 DC in each of next 25 (25, 25, 25) Sts, DC2Tog.
Opposite Shoulder (right shoulder, left when worn)
ROW 4 (6,8,10): DC2Tog, work 1 DC in each of next 27 (27, 27, 27) Sts, turn ROW 5 (7,9,11): CH 3, work 1 DC in each of next 26 (26, 26, 26) Sts, DC2Tog, turn ROW 6 (8,10,12): DC2Tog, work 1 DC in each of next 25 (25, 25, 25) Sts
Fasten off, leave a long tail for seaming last row to the back panel.
Back Panel
Make the base chain 102 (122, 142, 162). The first 99 (119, 139, 159) chain stitches make the foundation chain, while the last 3 make the turning chain) in gray color.
ROW1: DC into the fourth chain from the hook and work 1 DC into each of the next 99 (119, 139, 159) sts, turn ROW 2: CH3 (counts as first st), DC in each of next 99 (119, 139, 159) sts, turn
Rows 3-56 (62, 68, 72): Repeat Row 2. Fasten off.
Assembly
Block your panels to the measurements listed above.
Lay your front and back panel together, correct sides facing. Line your stitches up from both panels evenly. Seam the first shoulder together working through both panels using your method of choice. Repeat on opposite shoulder. (Pic 2)
Join yarn at the bottom hem of the panels. Seam the sides together from the bottom up. Do not seam all the way to the top. Leave a 7”/18cm, (8”/20cm, 9”/23cm, 10”/25cm) opening for the arm hole. Repeat on opposite side.
Neckline, Sleeve and Bottom Edge Trim (optional)
Using bright pink yarn (or any you like) embroider blanket stitch edging. Сreate a few long stitches for the eyelashes (optional)
Weave in all ends.
Copyright notice: You may not reproduce any of the photos or the text without obtaining written permission from me first. Thank you!